This is the first post of a recurring series by Abby Grace Photo. Abby did a TON of DIY projects for her stunning wedding this past winter and will be sharing them with you over the next few weeks! Take it away Abby…
Hey, DC brides! First of all, it is such an honor to be chatting with you all. I was so stoked (yes, stoked) when Bree asked me to share some of my DIY products from my wedding. So here I am for the next few weeks, pouring out my ideas and creativity. I’ll try my best to let you know where I got each component of each project, too, in case you want to recreate your own version!
A little bit about me- I’m a wedding photographer in the DC/Northern Virginia area, so I LOVE all things nup tial. I married the most wonderful man and my very best friend this past January in Fairfax, VA, and life is good. :) He was such a trooper and helped me with ALL of my DIY projects. Now you know I’m talkin truth (Ke$ha?) when I say he’s wonderful! I couldn’t have gotten everything done without his help. I also love Harry Potter (bet I could beat you at Harry Potter SceneIt!), Pottery Barn, CraigsList (to purchase Pottery Barn decor), and Pixi Stix. Oh! There’s this amazing drink called the Pixi Stick! I’ll totally sneak that into a future blog post… maybe Bree won’t notice! :)
Now! On to wedding invitations, which, truthfully, is probably why you’re reading this blog post.
My inspiration for the wedding invitations came from a collage of ideas. I knew I liked the idea of a layered invitation because I’d seen my ever-crafty mother do the same sort of design for invitations a few years ago. We were on a really tight budget ($7K), and I knew we wouldn’t be able to afford the formal letterpress invitations or something custom designed from a stationer, so we turned to a friend of ours, Bret Johnson. Bret is the pastor of a church I attended when I was in college at Radford University and one of the most genius graphic designers I’ve ever met. Seriously, he’s GREAT. He’s done invitations for a couple of friends of ours, so we asked if he’d be willing to do them for us.
After deciding on a snowflake theme, we went on to a stock vector site (like stock images, but for graphic designers) and picked out a couple snowflake designs we liked.
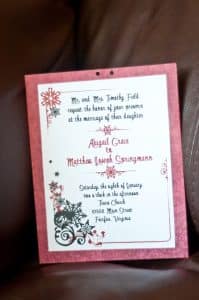
Bret took our favorites, along with my verbage and a color sample of my bridesmaid dresses, and designed the invitation you see here:
The design was a quarter page, so we took the 4-to-a-page PDF to Office Depot and had them printed on paper I purchased at Paper Source (if you haven’t been there, you NEED TO GO! It’s amazing!). After cutting them all down to size using a papercutter from Michael’s, we mounted them on the red background, made of red patterned scrapbook papers (also from Michael’s).
We then cut out vellum in corresponding sizes, laid it over the invitation, punched two holes, and tied it with silver wired ribbon, also from Michaels.

I think if I was doing the process over, though, I would have omitted the vellum– it detracted from the awesome invitation design.
If you’re gluing/mounting/sticking any sort of paper products together, use Zots! They’re little adhesive dots, and they make any sort of adhering process a dream. Our matching RSVP and hotel information cards (not shown, sorry! I couldn’t find them!) were also designed by Bret. We fit 8 to a page and also had them printed at Office Depot on Paper Source paper.
*Budget Saving Tip*: We did our RSVPs a little differently- rather than spend all that extra money on postage for an RSVPS that half the people wouldn’t send back (I’m soo guilty of missing RSVP dates…), we set up an “RSVP email address.” It was just mattabbywedding@blablabla. It was so much easier to keep track of and instead of including our registry information in the invitation, we just tacked it onto the bottom of the “thanks for RSVPing!” auto response. We also included my cell number in case someone wanted to call, but most people used the email address.
Finally, the envelopes we used were also from Paper Source. Our invitations were an unusual measurement- 4 5/8″ X 6″, but Paper Source had so many envelopes to choose from that we were able to find one that fit perfectly. We didn’t bother with using the “inner envelope” tradition, either- that would have been twice as many envelopes to buy, and it would have been just another step in the process.
Phew! I think we’re done with invitations. I hope you feel better about venturing into doing your own invitations and always, always feel free to shoot me an email with questions at abbygracephoto@gmail.com.
On the itinerary for next week: Delicious DIY favors!


5 comments
Great job Abby, those are gorgeous!I am totally a DIY fan… I can’t think of anything that I didn’t do myself at my wedding, or had a friend do (cake, sewing, flowers, everything!) I REALLY love pretty papers and stationary, but we were on a tight budget, too (we did everything for less than $4k, though!!!), so, I just found styles of invites that I liked and copied the style. I “designed” a half page, invite, with black and a dark pink color. I found a rubber stamp at Michaels, and after printing out the words on the computer, I just added the stamped image, then took them to Kinkos to get them copied for 50 bucks! I ADORE my invites; they might have been one of my favorite things. In my opinion, they looked very modern and professional.
YEY for successful DIY projects!
Hi Elizabeth – I am always looking for contributors to the blog! Let me know if you want to share any of your DIY projects via “How-To” tutorials! I think readers would love to see that!! :)
Wow, I am very flattered that you would ask! I’ve never been asked to contribute to a blog before. However, I am not really sure how good at it I would be; I would have trouble getting good photos of my projects, and we spent so little money on our wedding that it might be BELOW DIY standards. I’d be honored, but I’m not sure my projects would be up to par.
Hey Elizabeth, shoot me an email (capitolromance@gmail.com) and we can discuss it further!